Constant Backflow Monitor

We sat down with Dave and Melissa to explore their new project titled, Constant Backflow Monitor.  Interns Dave and Melissa, along with Prof. Randall Schuster worked on this project.   Randy was asked by a former co-worker who works in the industry for this project. The Constant Monitor Backflow project is a new system where we monitor the backflow prevention to detect problems before they happen. The purpose of the backflow preventers is to prevent the contamination of the pure water on campus with the sewer lines. 

Backflow Monitor Preventer
Constant Backflow Preventer Monitor

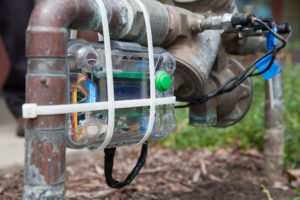
Now, it can be constantly monitored which will help to detect problems sooner so that they can be fixed in a timely manner.  This project was ordered because the annual tests would only detect problems once a year, but now it can detect problems to be fixed quicker which will increase productivity, and they do not need to turn off the water for the constant monitoring, where with the annual tests the water had to be shut off.  The project began about two years ago, and the interns predict that it won’t end because the project is constantly evolving and they are brainstorming new ideas to improve its productivity. They hope that by the end of the summer, there will be monitors over the entire campus. Currently, they have one backflow moinitor.   By the end of the summer, the interns’ goal is to have one monitor per backflow all over the campus. By increasing the number of monitors, this will help increase the prevention of problems. 

Backflow Monitor - Guts
Backflow Monitor – Guts
Backflow Monitor - More Guts
Backflow Monitor – More Guts

Design Hub interns, Bailey Wineland and Angelique Doty, were responsible for documenting this project with photographs and written articles from interviewing them.

Laser Engraving at American River College

The Design Hub of American River College conducted one of the first projects using the Laser Engraver.  Shailza, one of the laser engraver interns working on this project, demonstrated how it produces the gentle, artistic shades of black and white on the sturdy wooden boards.  Plywood is used as the canvas, and the laser carves in its drawings. The Laser Engraver obeys the commands sent by the software on the computer to create whatever artwork the intern orders it to.  For this particular project, the deliverables are name tags made of wood for all the interns who are working for the Design Hub.

This project of engraved name tags gives all the interns a sense of community, since we are always collaborating and working together to contribute each unique skill set to the various projects.  The original idea for this project was right at the beginning of this spring semester because it gives a feeling unity and family to the new incoming interns just now joining the team. The engraved name tags were completed a couple of weeks ago, and can be viewed in the Design Hub lab.  Even though the actual project for the engraved name tags is complete, the Laser Engraver will be frequently used during the full course of this semester. 

The Full Spectrum Laser Retina Engrave 3D software orders the laser to cut out the name tags. The shaded pink section we can see in the photo to the left is the area that the laser already engraved, and the white areas are what is left to be carved until the project is finished.

 Shailza, a hard-working intern trained in the art of laser engraving, showed a one-on-one demonstration of the laser engraver in action!  First, you open up the file in the special software, Full Spectrum Laser Retina Engrave 3D. She showed the computer settings required for the engraver.  

FUN FACTS:

  • Whatever image that the intern wants to print must be in xps format
  • The raster power CANNOT be at 100%- we have found it most effective to be set at 65-70% for the best wooden artwork.
  • The raster speed is set between 45-50%, and the vector layers power is set at 70%. The IP address should show up on the laser screen.
  • And “Slow jog” isn’t just something a student does when they’re late to class on a Monday morning after sleeping through their alarm, it’s also the setting on the control panel to give the intern more control over the laser so it doesn’t go flying off in a frenzy.

Once the settings are properly set, the wood is positioned to be carved into, and watch the time at the bottom of the screen allows the students a time frame for when their project should be completed.  The average time is 7-8 minutes- like for the name tag project- but it depends on the size of the wood/project.

The laser engraver, Photo by photography intern Angelique Doty

The next project also on the Laser Engraver leads us to meet Jacob Olson, who brings ideas to life through the art of 3D printing and laser engraving.  He is trained in laser engraving and is a solid modeler for the Design Hub. He also tutors design technology programs such as Autocad, Revit, Sketchup. 

Jacob takes family photos, and creates images printed onto wood through the scientific world of computers, cyberspace, and LASER TECHNOLOGY (cue the “Twilight Zone” theme song).  

Jacob is providing this project with his own family photos of his great grandparents, inspired by his father’s idea, and giving them as a present to his grandpa. The end product will be a collage of family photos laser engraved in the plywood.  Jacob showed us around the laser engraver to get a feel for it and showed me exactly how the machine works: the water filter from the bucket pumps up water and keeps the laser tube cool while the exhaust fan pulls out smoke and filters out the exhaust to prevent turning the interns’ hard work into a barbecue.  There’s a cycle of water that goes from being pumped from the bucket, to the laser tube and back to the bucket in a little circle of life. 

The artists of the Design Hub have an ongoing task of creating new ideas to contribute to being engraved into wood using the Laser Engraver.  There has been extensive training to prepare the interns on how it’s used, including training sessions they attended, as well as sample tests before running the actual name tag project.

ARC Design Hub Drones Take to the Sky!

Photo by photography intern Angelique Doty

On March 2, 2018, middle school and high school students from Heritage Peak: Pacific Charter Schools visited the ARC campus to view the demonstration of drone flying put on by the drone-flying interns of the Design Hub: Sean, Jason, Shane, and Allan.  Jason demonstrates the flying of the drones using remote controls, while Sean presents the technique of using hand gestures to direct the drone on where to fly. The basic ground rules for the drone flying demonstration in the gym was for all people in the gym who are not currently involved in the drone flying to stay behind the blue line, except for the individuals who are either showing the students how to fly the drones, or the students actually participating in flying the drone. Angelique, one of the Design Hub’s photography interns, had the opportunity to fly the drone. “Jason showed me how to guide the remote control to direct the drone to wherever I wanted it to go. It was like a real life video game!” She tells us afterwards.

Angelique is the Design Hub intern behind capturing the photos of these drones, and is our eyes and ears for fantastic events like these. She is one of the several very talented photographers we have on our team, and is an integral part in bringing the Design Hub stories to life. She takes our articles to a whole other level, because without pictures these pieces would be all bark and no bite. Here is a quick thank-you to her!

This event Angelique covered was made possible by the CTE department reaching out to the drone flying interns of the Design Hub through Randy Schuster, who put this event together. This event was put in place to encourage more students to discover all the different educational opportunities that ARC has to offer. There will be further development and a build of programs, especially in the photography and agriculture departments.  The drones will be flown on campus in certain areas. For this event, it was held in the gym and on the neighboring field. Due to restricted airspace, there are regulations for how far the drones can be flown in the air. They are in the process of setting up another drone flying event on a specific day during the month of April, and are working on getting certain days set up to fly the drones during the semester. 

Photo by photography intern Angelique Doty

Flying these drones isn’t the only thing our Design Hub interns get to do, either. We actually make them by hand here in the Hub’s maker space! Every piece is designed on the computer by our modeling interns, and sent to be 3D-printed in our 3D printing lab. From there, the pieces are assembled by hand, and the tech needed to fly the drone is inserted into the drone body. Then, voila- we have a drone that is ready to fly! No drone kits required. Here at the Design Hub, our students really take pride in their work, and are happy to share with others and inspire younger students like the ones at Heritage Peak. If we left at least one inspired student from this visit, we consider that a win, and we hope to see that inspiration someday flourish into something great.